- 15 Jan 2025
- Print
- DarkLight
McAfee Exceptions
- Updated on 15 Jan 2025
- Print
- DarkLight
McAfee Exceptions:
If you’re reading this guide, it means the antivirus software “McAfee” is flagging an important file on your PC causing issues with the GSPro application.
Why Is A File From GSPro Flagged?
GSPro receives a lot of traffic via updates, course downloads, ect. Even if GSPro has worked without issue for a long time, new updates/packages can trigger McAfee to quarantine files for GSPro.
How Do You Fix A Flagged File For GSPro?
Before going into fixing a potentially flagged file for GSPro, the easiest/best method to prevent this is to delete McAfee as a service from your PC. If the service is no longer needed or active, I’d recommend deleting McAfee from your PC. If you’d wish to keep McAfee on your PC, please continue below.
Locating/Launching McAfee:
From your desktop, head to the taskbar and “Hidden Icon” arrow as seen below:
.png)
From here, right click the red arrow icon. From the dropdown options, select “Open McAfee Total Protection”.
.png)
Quarantined Items:
Now that McAfee is launched, click on the “four dot” icon found on the left side of the app. From the dropdown shown, select the “Quarantined Items” tab. This is where all flagged files will be held.
.png)
The process to “restore” files quarantined from McAfee is pretty simple. Locate the file in question. (For example: GSProV1Connect.dat) Click on the file name, then click “Restore”. This will allow the file to work as intended again. However, McAfee will shortly after run another scan. (Potentially quarantining the same file again) To get past this, you’ll need to create an exception for that file.
.png)
(Screenshot directly provided from McAfee’s support channel: https://www.youtube.com/watch?v=_X2uGq2rx6A)
File Exceptions:
To create an exception for a specific file, you’ll want to head to the same dropdown menu as shown before. This time, you’ll select “Real-Time Scanning”. You can ignore turning off Real-Time Scanning for now, as it’ll only temporarily fix the issue. Instead, click on “Add File” found in the bottom right corner of the application:
.png)
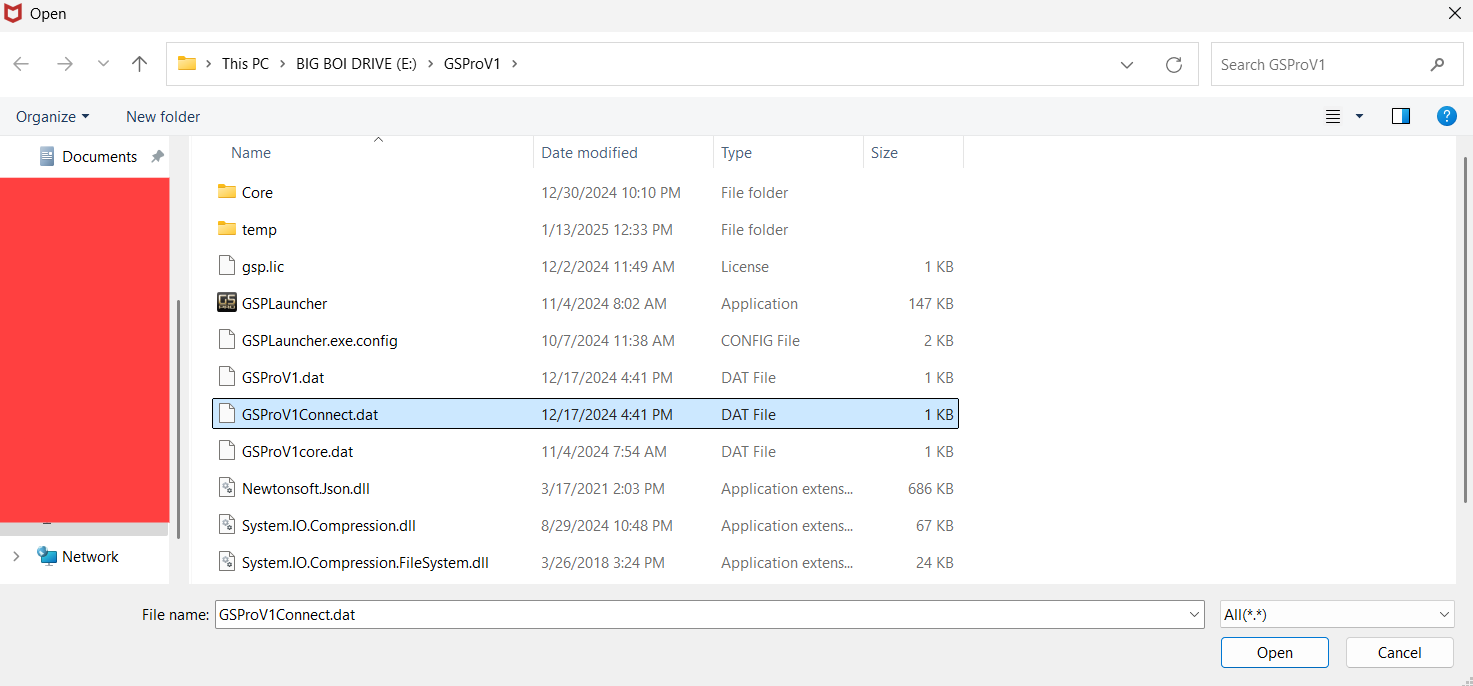
McAfee will prompt you with a similar screen to what File Explorer would show. From here, you will need to navigate to the exact desired file. If you are unsure of the file’s path, McAfee creates a handy path guide for the file’s location in the “Quarantined Items” tab. (If you still aren’t able to locate the file, feel free to reach out to our support email) In my reference, I’ll stick with the example of the “GSProV1Connect.dat” as my targeted file. You’ll click on the targeted file then click “Open” in the bottom right corner of the screen:

Once completed, the selected file will show under the file exceptions as seen below. Once done, you should be all set:
.png)

